Showing posts with label toy. Show all posts

Dec 27, 2014

D334: Home Baked Oven

This was done back in October.  Yes. I've been absent.

I haven't been idle, however. It's just that the stuff I've been doing - writing - is something I'd like to keep separate to this.  That said, life hasn't been completely devoid of craft and such.  Here is an example of one project that seems to have been a winner.

Here is Bub, fresh from her nap, and its the first thing she did at the new oven - wash her hands!
I love that Bub knew exactly what was going on when she discovered this.  It took maybe an hour.  Use packing tape if you have it, not electrical tape like lazy me.

So, for this I used 
  • A box of suitable size and shape;
  • 4 pipe-cleaners;
  • An empty egg carton;
  • cello or sticky tape;
  • scissors;
  • Stanley knife (box cutter);
  • two paper or plastic plates;
  • one plastic bowl; and
  • aluminium foil.

I recommend not taped the box closed.  Using the lid for the stove top worked really well as its easy access to anything that needs repairing.

These are the pipe-cleaners being stuck to the "taps".  This is not the best tape to use :(
Bub cooking an egg in the oven, on the 'biscuit tray'.
The pipe-cleaners threaded through the box lid with a twisted loop used to secure it.
The 'taps', made from egg carton cups, and the 'spout'.
The loop of tape on the back of the foil-covered paper plates ('hot plates').
Foil covered plates, attached with a loop of tape, for 'hot plates.
Folded cardboard cut into shape and attached with pipe-cleaners and tape.
I traced around the edge of the bowl and used the box-cutter to cut inside that about a centimetre.  The bowl is taped in.
I used a box-cutter to cut between holes made with a pencil.  The fold points are reinforced and a partially folded piece of tape is the handle, which has worked really well.
Reinforced oven door "hinge".
A piece of tape partially folded to make a handle.
The oven tray, secured to a quick oats box (also taped to the base), and the fire in the background (triangles of paper!).

Jun 18, 2014

D297-307: Back in a tick...

Sorry... sorry.  I know.

I finished the ring stacking toy.  It's not perfect but meh good enough.  I did not enjoy doing the base.  Bub does enjoy playing with it though.

I haven't gotten any further with the bell capsules, although the toys that they're to go in are sewn and awaiting this.  My sister suggested I buy a heap of Kinder Surprises and keep the toy container... very sensible and tempting.  I could also buy a pack of 30 for a bit over $30, which is a comparable price against the chocolates, per capsule, and also save me having to faff around with teeny toys.  Something about the website puts me off though.  I'm not sure what... it just took a long time to find a supplier who sold them in batches smaller than "500pc" or "3kg" and they're unfamiliar...  I'm so precious.

I have also basted the gifted quilt mentioned here.  I ended up getting some rather thing cotton batting and a plain mid dusty green fabric.  It's quite a heavy fabric with an open weave (I can't even remember what its called, for shame) but it matches the greens in the front quite well.  So far I've done about two thirds of the ditch stitching.  It took some adjusting of the tension before the lower thread stopped breaking when sewing at speed, even with a new needle and the bobbin case freshly oiled.


I also mended some pants for a friend, including using the blind-hem foot.  It wasn't quite as hidden as I'd have liked, but time and suspecting it wouldn't actually be better without pressing, re pressing, and possibly leaving a ridge there anyway.... I just didn't want to over engineer the whole thing and make it worse.  such the optimist.

In other news, Bub has slept through three times now.  THREE!  (Not in a row.)  And I don't mean one of those ridiculous 5-hours-is-a-technical-sleep-through but an actual 8pm-7am sleep.  She's 22mo this week and she's slept through the night three times in her life.  I'm hoping it's a trend.

D296: Toy bells!

No, not bells that are toys, but bells that go into toys.  I need cases to put around my bells so that they're not muffled by the stuffing.  A friend of mine has them - they're like big pill capsule cases. I went to my local spotlight this morning after having called to get something like these...


They were there, apparently, but after looking and looking their local craft lady said they didn't have them.  They had squeakers, but not bell casings.  Humph.  So I bought some cheap plastic shot glasses instead and thought maybe I could get some sticky tape or glue involved...


Poxy, I know, but desperate times... 

D295: Stuffed and stuffed

Today I learned that when a pattern says it 'uses' a 3/8" seam allowance it means that it's included that allowance in the pattern pieces. Sad face.  Had to chop some bottom off all my pin covers.  I'm not sure it's going to fix the problem but I'll make it work somehow.

Here is a different but related example.  Sewing the rings on the ring stacking toy are clearly explained in the text, but lots of pictures, but not in the pattern.  The sewing vs cutting lines in the four base pieces are less clear.  I think dotted and dashed lines could've been used more consistently and it would've been a great help.


So, a general request to pattern makers, please be as consistent as possible across pattern pieces. Note things on the pattern pieces: "6mm SA included" for instance, or even the name of the pattern! As it is, when it dig up this very simple pattern in the future, I'll still have to go back and scour the instructions to be sure I get it right and I'm sure pattern pieces can be more helpful on their own.  

May 17, 2014

D294: Today's sewing prowess

The green ring turned out, the blue ring and stand sewn up too, all ready for stuffing and batting. Three pin tops sewn, three more prepared (awaiting bases and stuffing) and a ball shell. 


May 13, 2014

D292: Empty rings

For a toy ring stacker...

The inner and outer circles of the red right were done with a regular zigzag foot. The orange and yellow with the BSR foot.  But the green had the outer with the zigzag and the inner with the BSR as a darning foot.  I thought I might be able to use the circles to practise some freemotion sewing. However the BSR foot really needs the thickness of a quilt to work properly.  It was better as a darning foot (with the cable disconnected) because I could use the steady rhythm to map the needles around a steady curve. But even then, the thinness and  and my clumsiness wasn't satisfactory.  I didn't want to have the curve ruined by poor practise.

The other thing that made me think of the BSR foot was the joining seam, which is very tight.  See the green one partially turned out? It needs a seam 3/4 of the way around the circumference - that pinned raw edge - and it barely fits comfortably around a regular zigzag foot. It's certainly fiddly while sewing and very hard to maneuver the inner edge of it without catching the bulk.  The BSR as a darning foot has been worthwhile in that front, but...

Longer story shorter: I'm about to hand sew the green ring's joining seam :|

Apr 21, 2014

D280: Cutting it all!

We're off to the in-laws' for a while and I'm hesitant to start on any new sewing, so I've decided to cut fabric in preparation.  I've even packed away the machine! It's strangely liberating and I've already cut two projects today (although one of them requires a lot of pressing and interfacing before I can sew).

More on the horizon I hope.

A toy that may go OS - not sure about the colours...

Another toy, awaiting interfacing...

May 27, 2013

D105: Finally!

I finally got the photos printed and into the cubes!
Uh mah gerd I was so slow at doing that.
Tomorrow's job is mailing it off!

I am very pleased with the result though! :)

Feb 12, 2013

Day 37: Cockatwo

My effort at a Sulphur-Crested Cockatoo. It would be completely white except for the nine yellow ribbons in the crest. The yellow feathers on this bird are hidden when they're not flying.


I'm not sure the back gusset is the best length, but I won't know until I actually make it. To be properly complete I'd need to trace and separate the wing piece. On the other hand, this is not a project for the ear future. I've way too many UFOs to be taking on something I'm not dying to do!

Feb 11, 2013

Day 36: Majaaaw Mitchell!


Aaaaaw! Look at this Major Mitchell cockatoo!! I'm still amazed.
The final product, with the prettiest band-aid eva.
I found a good webpage of Major Mitchell cockatoos and decided to do a standing bird minus the legs.  I started out making a flat version of a cockatoo that would be standing on the ground.  Then I decided I would try giving it some depth and nutted out a few gussets, with no idea how well it would actually work. But you know caution, wind, etc.

Feb 10, 2013

Day 35: I am amazed!!

I've amazed myself!

After the disappointment of last night's realisation, I decided before breakfast that I'd make something comforting: a nice easy, reliable, achievable item that would be quick, pretty and fun. I remembered  Emmie's Taggies Birdie and thought that was the job for today.

I love my French curve.
I made this pattern in preparation.

I held it up for Hub to see. It's nice, he says, but maybe you could make an Australian bird, like a cockatoo.  The wind out of my sails, I wracked my brain.
I haven't any yellow, I said.
We've an old T-shirt that's going to waste, offered the Goddam Problem-solver.
I would like to try up-cycling something... Anyway, success was the name of the day, not experimentation. Not risk, no sir.
But now my design seemed so simple and inadequate. I was feeling beaten already.

I told Hub that I'd never made an animal pattern from scratch. Remember my little people? They were very odd. Today, I want something I can do.
But this will be so much more rewarding, he blithely counters. You'll feel so satisfied by the end.
Or hairless, I thought.

We looked through some picture storybooks for inspiration. Further intimidated by the beautiful illustrations and so wishing I could do a Crimson Rosella or a lorikeet, I tried going in reverse: what can I make. I went through my stash and thought of birds. Why was I still stuck on birds? Because I'm nothing, if not hopeful.

So I flipped through some Google images of a bird I did have the materials for, turned the page over and sketched something new.

And it's turned out well! Like, way better than I expected. As in, really quite okay.

I'm 80% done.More pics once it's complete tomorrow!

Feb 9, 2013

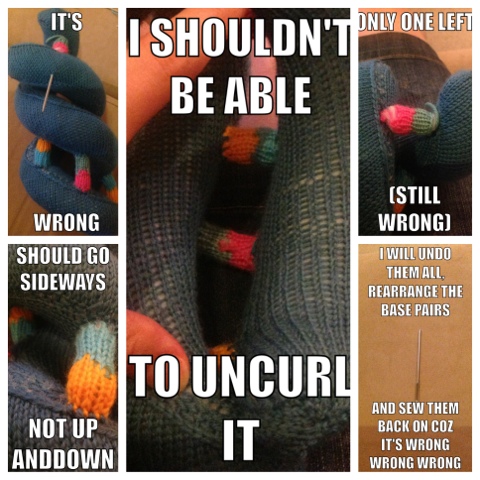
When Dr Frankenstein knits...


Unfortunately, this mutated DNA doesn't result in anything interesting.
It's just wrong.

Feb 5, 2013

Day 30: Awkward

Yesterday I mentioned that I thought the last stage if the DNA toy would take a while. How insightful of me.

Sewing these things on is a bit tricky. I could do them one at a time by marking the points for each one once I've spaced then out. But I'm not sure that it would make this much easier. Le sigh.


In other news, a month of daily posts today!! Hurrah! I really didn't think I'd get this far without skipping a day.

Yay me! :D

Feb 4, 2013

Day 29: All in a row

I made the last of the base pairs tonight. Here they are, stuffed and ready to be attached to the protein strands. I need to work on my cast off being as loose as my cast on!

I think putting it all together will take longer than I think...

Feb 3, 2013

Day 28: Little knitting

Another base pair done. Lost my yarn needle. Busy day.

Jan 31, 2013

Day 25: Counting base-4

Today I made the fourth of six base pairs and the first of the orange-blue set (GC).

Jan 30, 2013

Photo cube project: Done!

Done diddly dun-done!

The six different cubes

Below: Top and bottom rows are the feature fabrics; middle rows are the two sides.


Knock 'em down! KNOCK 'EM DOWN!!

Jan 29, 2013

Day 23: Sigh of content

The last of the hand-stitching is complete!!
Pics of the set tomorrow :)


Jan 26, 2013

Day 20: Australia Daying

I celebrated Australia Day by voting in the Spoonflower competition of Australia-inspired designs. So many beautiful patterns created; somehow I narrowed it to 25 favourites.

Two more cubes completed too. Only two more to go!